
Introduction
Google is far and away the largest search engine on the internet today, which means that when your potential clients get the inclination to look you up online, they are most likely going to start there. Therefore, arguably the most powerful place to collect reviews of your business is on Google.
This cheat sheet will guide you through the process of creating your Google My Business page, asking for reviews from your past clients, and setting the expectations of your current clients so that they are more likely to write you a 5-Star review at the end of their transaction. It will also cover how to respond to poor reviews.
Create Your Google My Business Account
In much the same way that Facebook requires a personal profile in order to create a business page, the very first thing you need in order to proceed is a Google account. If you use Gmail or have a Google+ or Youtube account then you already have one of these. Log into that account to continue. If you do not have one, or would like to create a new Google account for your business, then please click here and fill out the appropriate information. Creating a Google account is free!
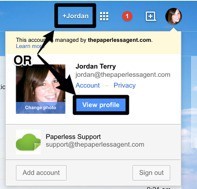
Once you've signed up for Google and logged in, view your Google Plus profile. The easiest way to do this is to click your name in the top right corner. If you have multiple Google accounts, then you'll need to hit the circular picture at the very top right of your screen and view the profile of the account you want to use to own your business page.
There will be a menu button on the left-hand side of your Google+ page that says Home. Click on it to reveal a drop down menu of options.
Select Pages then the blue button that says, "Get Your Page."
You'll next see a page with three options for your type of business. Here's where it can get a bit confusing. We recommend that you chose Storefront as your business type. Many of you reading this will be individual agents at brokerages, and you might not think you qualify as a Storefront. However, brand pages do not currently include the ability to collect reviews, and the service area option is more for businesses whose services are limited geographically, such as pizza delivery and taxis. That being said, if you are not currently attached to a brokerage or are thinking about moving brokerages in the near future, then you might consider choosing Service Area.
Even though you are choosing Storefront, you will not need to use the name of your brokerage in your Google My Business page name. Instead, in the search bar on the left side of your screen, you should search for Your first name last name, Realtor. Make sure that you hit Enter or click the magnifying glass icon after you input this search.
Google will supply you with a list of places it thinks match what you're looking for, but of course none of these will match since you're creating a new page! Click the option at the bottom of the list that says None of these match. Add Your Business.
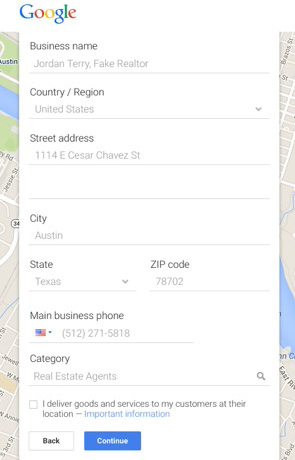
A list of information fields will appear, and you should fill these out as accurately as possible. In both the US and Canada, the only category you need to select is Real Estate Agents. You can use the screenshot to the side for reference.
Note that the street address is the brokerage street address, and the phone number is not a personal cell phone number. You do not need to put your brokerage phone here, but we highly recommend that you refrain from using your cell phone number since scammers often crawl these business pages, and you'll likely get an increase in spam calls. You can sign up for a free Google Voice number here, or get a ton more features specifically for real estate usage with BetterVoice by clicking on this link. Both of these options provide you with a new number that redirects to you regular phone.
Leave unchecked the box next to I deliver goods and services to my customers at their location. This is because, for your safety, you should always meet your clients at your office or another public space first. Hit Continue when you've filled in all fields.
On the next page, review your business information and check the box confirming that you are authorized to manage the business. Click Continue.
Most times, the next page will only show one option: verify your business by postcard. In some cases, a lucky few will be able to verify their business by phone. However, if this option isn't displayed on this page, you will only be able to use the postcard method, which takes 1-2 weeks to arrive. Click on the paper airplane icon to review your business information and select Send Postcard. Click Continue on the next page, which reminds you that you only have 30 days from the day of submission to verify your business using the code on the postcard. If you don't see your postcard within that timeframe, you will need to request another.
Google will then redirect you to your new Google My Business account, and direct you to fill out your profile. To look the most professional, choose a high-quality headshot of yourself, a high resolution version of your logo (which can be your brokerage's), and images of your listings or clients, if possible. Include your hours of operation and website address, as well.
The last step of this process is to verify your business, which again can take up to 2 weeks. You must verify your business to start receiving and responding to online reviews. Finally, these instructions assume that you were working on a computer, but Google My Business also has a mobile app. You can download it from the App Store on Apple devices and from the Google Play Store on Androids.